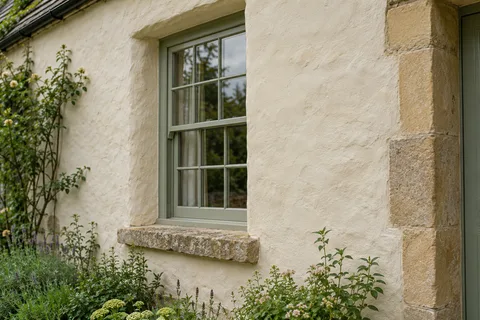
The small details shape the whole building
Keeping original features visible when re-rendering
A façade is more than its largest flat surface. Window surrounds, string courses, sills, bays and shallow projections give a Harrogate house its depth and proportion, and every render system adds thickness that can bury or flatten them. This guide explains how that happens and how the work is detailed so the features stay visible.

On this page
How new render changes the depth of a façade
Every render system has a thickness, and that thickness decides what happens to the features around it. On K Rend’s published figures, a silicone thin-coat system is a 4 to 6 mm base coat plus a 1.5 to 3 mm topcoat; a K Mono monocouche finishes at a minimum of 15 mm after scraping; and Tendring District Council’s conservation guide gives a traditional three-coat lime render as roughly 9, 9 and 6 mm. Whether that depth replaces old render of similar thickness or sits on top of it makes all the difference.
Applying new render over old moves the wall face outwards. A sill that projected 40 mm might then project 25, and its drip may no longer throw water clear. A stone band that stood proud of the render may end up flush with it. A window reveal becomes deeper and the frame looks further back. Where the old render comes off first and the new is built to the same plane, those relationships can be kept.
| Feature | Risk from added depth | Usual answer |
|---|---|---|
| Projecting stone sill | Less projection; drip stops working | Strip old render first, or extend the sill |
| String course or band | Render meets or buries its face | Stop render on beads above and below |
| Stone window surround | Looks shallower; render laps onto it | Stop bead to the stone edge |
| Quoins | Render smeared over corner stones | Stop beads and masking |
| Half-timbering and bargeboards | Timber edges swallowed | Keep the build-up thin; finish to the timber |
Taking old render off so the new face stays put
The simplest way to keep features legible is to remove the old render back to the masonry and build the new render to the same plane. That costs more labour than overcoating, but it means sills keep their projection, bands stay proud and surrounds keep their depth. Overcoating sound render with a thin coat adds only a few millimetres, which may be acceptable on a plain wall but rarely around shallow stone dressings.
On older lime-rendered walls there is a further point. Tendring’s guide says plastering beads, fixed guides and metal lath must not be used to artificially straighten the edges of an old wall: the render should follow the line of the building. A slightly irregular Victorian corner rendered with a crisp modern bead looks wrong, and the bead can force a thicker build-up at the high spots. Lime is worked by hand round the existing line instead.
Retained, repaired and reproduced features are different outcomes. A retained feature is original material left in place; a repaired one keeps some material and has new work added; a reproduced one is newly made to the old shape. Record which is which, with a few photographs, so the next person knows what survives.

The Harrogate features worth looking at closely
The 2010 appraisal lists the details that give the town’s houses their character: stone dressings to windows and doors, canted bays in stone or timber, two-storey timber bays (which it calls a rather unusual and characteristic feature of parts of Harrogate), decorative timber barge and eaves boards, quoins and generously projecting sills. In the Duchy Estate it adds half-timbering, oriel windows, tile hanging below bays and render on upper floors.
Walk round the building and note where the existing render stops, turns a corner or meets another material. Photograph each detail from a normal viewing distance and close enough to see how it is built, number the pictures and mark their positions on a sketch. That makes it easy to discuss a specific sill or bargeboard rather than “the one near the corner”.
Distinguish original features from later repairs where that can be established. If a detail’s age or construction is uncertain, record the uncertainty and seek advice rather than labelling it historic because it looks old.
For a wider project, compare the Harrogate rendering options against the features you intend to keep. The new finish should be drawn around those details; they should not become an afterthought once the main wall surface has been chosen.
Measuring the features before work starts
Measure how far each feature stands proud of the current wall face: hold a straight edge flat on the render and measure to the front of the sill, band or surround, then write the figure on a photograph. Compare it with the depth of the proposed system. On K Rend’s figures, a silicone thin coat over a base coat adds several millimetres if it goes over the old render, and a monocouche at least 15 mm. A sill that projects 20 mm loses most of its drip under a monocouche overcoat.
A sample panel is most useful when it includes a real junction: render meeting a stone surround, turning into a reveal or stopping under a band. A square in the middle of a plain wall shows colour and texture only; the corner shows whether the bead line, the depth and the edge finish look right.
Damaged features are repaired before the render goes round them. A cracked stone sill, an eroded band or a rotten timber bay is repaired or replaced first, by the right trade, so the render can finish against a sound edge. Render is not a way to rebuild a missing stone profile.
Where a feature is too shallow for any added build-up, the way to keep it legible is to take the old render off and build the new render back to the original plane.
Protecting features while the work goes on
Most damage to features happens during removal. Old render next to mouldings, surrounds and bargeboards is cut back by hand with a bolster rather than a breaker, and the edge is scored first so it breaks at the line. Stone sills and steps are covered with boards; timber bays and bargeboards are wrapped. SPAB’s advice to remove hard render by hand and avoid levering off large sheets is as much about protecting the stone behind as about the wall face.
During application, masking keeps render and spray off stone. Splashes are cleaned off the same day, while they are still soft; cured cement on sandstone is very hard to remove without scarring it. Beads at stone edges are set so the render stops short of the stone face rather than lapping onto it.
At the end, look again at the whole elevation from the street. Sills should still drip clear of the wall, bands should read as bands, and the stone should be clean. A tidy broad wall is only part of the result; the edges are what connect the new work to the building.
See housing and planning information for Harrogate and nearby places, including the source and geography behind each figure.