Matching is more than choosing a similar shade
Matching a new extension to an older rendered home
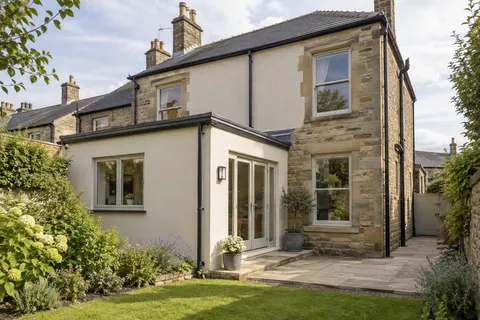
A new extension on an older rendered Harrogate house is usually block-built and finished in a modern render, while the house may carry Edwardian roughcast, painted render or lime. Matching them means deciding which of colour, texture and depth matters most, and detailing the junction so the two parts can move without cracking.

On this page
Matching colour, texture and depth
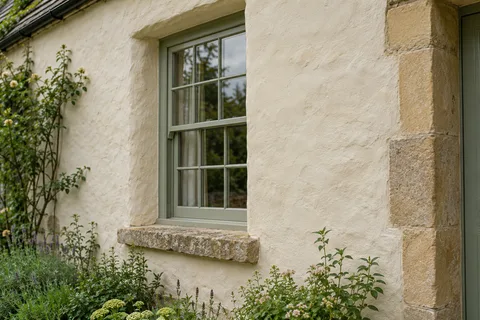
A new extension on an older rendered house is usually built of blockwork and finished in a modern system, while the house may carry an Edwardian roughcast, a smooth painted render or a lime render. The three qualities people mean by “match” come from different places. Colour can be matched most easily, by painting both parts or choosing a through-coloured render close to the old paint. Texture depends on the product: a scraped monocouche, a silicone grain or a floated finish each look different from an old roughcast. Depth comes from the wall build-up and the window positions.
If external wall insulation is planned on the extension, or on the house, depth becomes the hard one. Insulation moves the finished face outwards, so the two walls may no longer line up at the junction and the window reveals will differ. A section drawing through the junction shows this far better than a colour visual.
Decide which of the three matters most. Many good extensions match the colour and roofline but use a slightly different texture, so the new work reads as an honest addition rather than a poor copy.
| Priority | Useful evidence | Limit |
|---|---|---|
| Colour relationship | Samples beside the original surface | Age and light affect the comparison |
| Texture | Actual proposed finish sample | Small areas do not show the whole elevation |
| Proportions | Scaled elevations | Does not establish material compatibility |
| Projection or shadow | Section through the detail | Needs coordination with the actual assembly |
Where the extension meets the house
The junction is a meeting of two structures that will move differently: the new extension settles and dries out, the old house has finished moving. Render carried continuously across that line will crack along it. The usual answer is to stop the render on beads on each side of the junction, often at the internal corner where the extension meets the house, so any movement shows as a neat line rather than a ragged crack.
The new blockwork itself needs time. It should be dry before rendering, and the base coat needs to cure before a thin finish goes on; K Rend’s Silicone TC data sheet asks for at least 14 days on the base coat. Mesh is bedded into the base coat around the new windows and doors, where K Rend says reinforcement is required at stress points.
Where existing render has to be cut back to form the junction, cut it with a disc to a straight line so the retained render keeps a clean edge, and repair any hollow render found nearby before the new work closes it in.

Which finishes match which
Some combinations match well and some never will. A painted extension beside a painted house can be brought to the same colour by painting both together. A fine silicone thin coat can come close to a smooth painted render. A scraped monocouche has its own texture and will always look different from an old floated finish. Nothing modern copies an Edwardian roughcast exactly; a new dash on a dash receiver is the closest.
The old house is not one colour either. Its render will be darker near the ground, cleaner under the eaves and patched in places. Choose one area as the reference, usually a sheltered part near the junction, and match to that.
Look at the sample beside what stays: stone sills and surrounds, roof slates and window paint. The 2010 appraisal notes that many later Duchy Estate houses combine brick ground floors with render above, so an extension there may need to relate to two materials, not one.
The Harrogate house rendering overview covers re-rendering the house as well, if the old render is due for renewal and both parts can be finished together.
Building the junction and finishing round it
At the junction, the render on each side usually finishes on its own bead at the internal corner, leaving a straight joint. That lets the extension settle and dry without tearing the render on the house. Where the two walls are in line, a designed joint with beads either side does the same job in a flat face.
Wall thickness affects the match as much as the render does. If the extension wall is thicker or thinner than the house wall, the two render faces will not line up, and a short return or step at the junction is usually neater than forcing them flush.
Windows, sills, gutters and roof edges on the extension go in before the render, so it can be finished up to them; downpipes, lights and vents go on afterwards onto the cured render.
Where old render is cut back to form the junction, it is cut to a straight line with a disc, and any hollow render nearby is repaired before the new work closes it in.
If a new opening is cut in the old house to join it to the extension, the render around it will need repairing as well; include that strip in the scope so it is not left as a rough edge.
Planning, permitted development and the order of finishing
If the extension is built under householder permitted development, the government’s technical guidance says the materials used in exterior work must be of a similar appearance to those of the existing house. That supports a render that looks like the house’s render, though not an identical product. In a conservation area, the same guidance says cladding with render is not permitted development, so an extension there usually comes with a planning permission whose conditions may set the finish.
Order matters on site. Windows, sills, roof edges and gutters are fitted before rendering, so the render can be finished up to them. Downpipes and lights go on afterwards, onto the cured render. If the house is being repainted to match, that happens last, once the extension render has cured.
Finally, look at the result from the normal approaches to the house. The extension should meet the agreed visual brief, and its sills, roof edges and rainwater pipes should throw water clear of the new render.
After the first winter, look at the junction. A fine straight line along the beads is expected and shows the joint is taking the movement. Cracks beside it are not expected, and point to movement or water that the detail has not dealt with.
See housing and planning information for Harrogate and nearby places, including the source and geography behind each figure.